
For anyone who hasn't come across a pole lathe before, it's a human-powered, wood turning lathe dating back many hundreds, even thousands, of years. It uses a cord attached at one end to a treadle and at the other to a long pole that acts as a return spring (many lathes these days replace the pole with an elastic bungee chord as it takes up far less space, but the result is much the same). The cord is wrapped around a piece of wood held between two metal centres. As the treadle is depressed, the piece of wood spins one way and when the treadle is released, the spring returns, spinning the wood back the other way. Here's a nice video of Robin Wood showing how it's done https://www.youtube.com/watch?v=cGUzC_lXT8c.
I built my first pole lathe a few months ago and said at the time that if, after a bit of testing, it was working well, I'd share some plans to help others build their first one with the idea that after a bit of experience in turning, you can get a better idea of your own personal preferences, dimensions, design, etc and make adjustments as you go or build another one to suit you better.
I've turned something like 25-30 bowls on mine and it seems to be going well so I've drawn up a plan that anyone can download for free. At the bottom of this post there's a link to my templates page, where you'll find the plans, and hopefully the photos here will help things to make a little more sense!
** I do want to make it clear, I still consider myself very much still a beginner when it comes to bowl turning and this post is really for other beginners. I'll put a list of some much more accomplished turners at the bottom, all of whom have been very generous in sharing their knowledge with the green woodworking community and are well worth checking out! Among them are Sharif Adams, who has also shared his own lathe plans, available here http://www.sharifadams.co.uk/video-blog/4594462096, and Owen Thomas, who has documented a lathe build in several videos on his YouTube channel, available to view here https://www.youtube.com/channel/UCqdsK4VPmNafVBE5JYIaV6Q**
Through using lathes belonging to other people, I realised that the design is very flexible depending on things like the size of the person using it, the space you have, the need for it to be easily assembled and disassembled and the wood you have available to make it. This makes building the first one tricky in that there's no 'one size fits all' design to follow and many that I'd used were far too big to fit in my shared workshop space.
So I found pictures of as many designs as I could, watched lots of videos, measured my space and drew up a plan that I felt would work.
I decided to use a single piece of dimension timber, a 5 metre length of 9" x 3" pine, and machine it down to make the component parts using the tools in my workshop.
I would say that this lathe is probably a touch on the light side, especially if I were to turn really large bowls. Using a heavier wood than pine would fix this, as would simply weighing down the base.

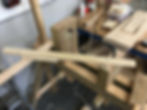
Front view - I decided on separate lengths for the legs and uprights so I could fit the lathe in my car when disassembled.

Side view - I made 'A' frames, rather than more traditional splayed out legs, to save sideways space.
You can also see I've fixed one end of the treadle to a piece of wood on the floor, which I weigh down. Before I did this, the treadle would move around a lot, so this has steadied things up a lot.

Close up of the legs
View from the perspective of the turner - I've found that I like to have the tool rest protruding beyond the small poppet on the right to rest my hand when working on the base. I've also put a small block between the poppet and tool rest to raise it up slightly.

Better view of the poppets - bowl lathes have the centre on the small poppet sticking out like this so the tool can be extended far to the right without the poppet being in the way. The best way to make sure the centres are level with each other is to fix the one in the small poppet first, then use that to mark on the large poppet where the other centre should go. My centres were made by Jack Labanowski, who you can get in touch with through his Instagram.
The poppets are held in place by wedges, hammered through holes in their 'tail'. It's very important when creating these holes that they extend up beyond the lower edge of the lathe bed, otherwise the wedge won't work!

This arm, attached to the large poppet, supports the tool rest and has pegs to stop the rest sliding back and forth.

This cross piece braces the two uprights - it's not totally necessary, but avoids the risk of the uprights snapping inwards from the pressure created by the bungee. I used a simple (and pretty rough!) mortise and tenon joint as seen in the next picture.

These pegs hold the bungee in place - you can see where I carved the corners off the upright to avoid rubbing and wear on the bungee. I use a carabiner to attach the cord to the bungee, which makes it really easy to slide across. The bungee is a 5 metre length of 12mm elastic bungee rope and the cord is a roll of 4.5mm chainsaw starter cord, both bought on eBay.

The mandrel - some people use spikes to attach the mandrel to the bowl blank, but I've had them come loose a few times, a problem I've never had with a tenon. From what I've been told, it's mostly down to personal preference which you use.
Click here to go to my templates page where you'll find downloadable plans. Please do tag me in any social media posts you share and get in touch if you have any questions, I'll answer as best I can!
Please also check out the work of these bowl turners, many of them also make tools and offer lessons so do contact them if this is something you're after (click their names to go to their Instagram accounts) :